Some preschool science activities are designed to foster scientific thinking. They ask kids to consider how we can use observations to test our ideas about how things work. Other activities may address practical, hands-on skills. How do you use a magnifying glass? A pair of tweezers? How can we keep track of our observations? How do we measure what we see? Here are some ideas for encouraging kids to explore objects with tools.
It’s easy to come up with a list of supplies or science tools for children to play with. Here’s one to get you started:
- A balance scale
- A ruler
- Graph paper
- Tweezers
- Sticky tape
- A compartmentalized box for sorting & storing specimens (like seeds)
- Drinking straws
- A flashlight
But what do you do with these things? How do you get kids to use them?
We should realize that adult instruction can backfire. Recent experiments suggest that preschoolers are less likely to investigate all the uses of a tool if an adult tells them how it works. However, it’s obvious that many kids end up ignoring interesting equipment because they don’t know what to do with it. It seems to me that children sometimes benefit from our suggestions.
For instance, what can you do with a balance scale? Left alone, kids load each weighting platform with various objects. But without a purpose, they may soon lose interest. Showing kids how to use standardized tokens to measure weight opens up new possibilities.
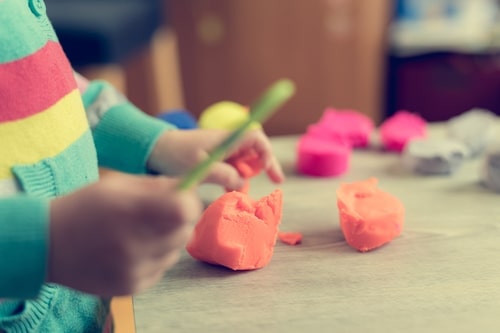
And introducing a few goals – or questions to answer – may spark more exploration. You might suggest that kids open a creature clinic – a veterinary practice where they can use science tools in the context of pretend play. Have children mold animal figures out of clay, and then examine them. The figures needn’t be complex. Even a very young child can learn to roll out a simple clay snake.
Here are some activities to try next:
- Measure height or length. Measure the toy directly, by holding it alongside a ruler or yardstick. Alternatively, lie the creature on a piece of graph paper and mark off the animal’s body length. Then count the squares between these marks. You can chart the results.
- Measure weight. Again, you can chart the results.
- Make your clay animals “grow” by adding more clay, and have them return to the clinic to be measured. How much longer/taller are they now? How much heavier?
- Compare your animal patients by height and weight. Who is the tallest? Who is the heaviest?
- Learn to use tweezers by removing “slivers” or “thorns” from a clay animal’s skin. For this activity, put a number of rice grain “slivers” in the “skin” of the animal, allowing each grain to poke out from the clay. Provide children with tweezers and ask them to remove the rice grains and place them in a dish.
In the same way, you can encourage kids to investigate the uses of something like sticky tape. What very small things can we find on the floor? Or outside? The pavement might look relatively clean. But what happens if you put a length of sticky tape on the surface, and peel it back off again? What happens if you try this with the sold of your shoe? Or your bare foot? Kids can use sticky tape to collect and examine all sorts of things – dirt, fibers, seeds, and leaves.
And flashlights? Drinking straws? Most kids won’t have any trouble finding things to do. But you can introduce them to some unexpected uses. A flashlight becomes more interesting when paired with a prism. And by staging an activity that transfers drops of colored liquid to craft paper, kids can learn to use drinking straws as pipettes.
More ideas
For more advice on how to teach science to young children– and other preschool science activities — click here.
image credit: child’s hands creating something with bright orange craft clay by Bizi88 / shutterstock